Hull #200 - Ella Marie
Quick Facts
- Model: Cruising
- Year Built:
- Hull #: 200
- Vessel Name: Ella Marie
- Owner Name: Lloyd
- Hailing Port: Pelahatchie, MS
Sailboat History
Llyod bought it from a fellow in Pass Christian, MS who had gotten it from the Boy Scouts in Louisiana in 1999. Llyod had it hauled up to a farm in central MS for work in 2002.
Llyod is doing a full rebuild and all images and text is credit to him. The information on this page was sourced from his forum post found here – http://www.plasticclassicforum.com/forum/viewtopic.php?t=2661
Owner Comments
5/2007 – This is my Bristol 27 coming out of the water the day I bought her waaaaaaaaay back in 2002. Not alot has been done to her since then other than stripping her down, until here lately. I finally started working on putting her back together. I’ll have more on that later after I get this posting stuff figured out.
I am a new member here although I found Tim’s Glissando site back in 2002…I guess I need to thank Tim for infecting me with this boat restoration bug. His Glissando site was a wonderful thing to find back then and I have learned a lot from it and this forum.
I bought it from a fellow In Pass Christian Ms. He had gotten it from the Boy Scouts in Louisiana in 1999. And no I had it hauled up to my farm in central Ms. The boat was a mess. The owner told me a can of starter fluid had leaked in the boat (forepeak) and somehow was ignited causing a small explosion which lifted the foredeck, blew the forward hatch off and pushed the forward bulkheads back. So over a long period of time I unbolted the hull deck joint, cleaned it out and put back toghter with 5200 rebolting it. I am in the process of taking the bulkheads out and replacing them.
5/2007 – Working on epoxying in balsa core. I managed to get a few more pieces epoxyed in.
4/2011 – am finally getting around to putting in new main bulkheads. I tabbed in the first one with 4″ and 6″ wide pieces of biaxial cloth. It’s 17 oz. w/ 3/4 oz. mat backing.
5/2011 – Built a new mast beam and put it in. Also managed to rip out the starboard bulkheads and clean up the area. I have installed both 1/2″ and 3/4″ bulkheads on both sides of the boat. Still working on getting all the tabbing on them and the tabbing done on the mast beam. Moving along verrrrrrrrrrry slowly but still moving along.
6/2011 – A little more work done this past month. The floor pan is made in two pieces. The main cabin area is one and the v-berth/head area is another. They come together at the 1/2″ bulkhead between the main cabin and the head area. They are not joined together in any way with a 1/8″ to 1/4″ space between them. Underneath there is nothing holding them up. So I built a small floor beam to go under the area where they meet.
I have it pushed in place only (it is very hard to reach through the acess holes in the floor, fore and aft of it, and reach it) and it seems to hold the floor up nicely. I will try to put a fillet on each side of the beam to hold it in place. I also got four new knee blocks cut out (not yet installed).
This morning I managed to get some work done on the starboard settee locker openings and bracing under the front of it. A little framing under the front of the port settee getting it ready for a face.
And the tops of the lockers in place. Today I cut out a couple of dividers to go under the settee to make three compartments. I moved on to the v-berth area.
I checked out the water tank under the forward part of the v-berth. Sticking the camera in the opening in the plywood for the fill fitting for the tank and taking a picture I could see that the tank had dropped down. It was suppose to be up against those blocks with the vees in them. So I got the saw out and cut an area out of the v-berth so I could get the tank out. Once it was out I could see that tabbing had come loose which had let the tank drop. cleaned up the tank which looks like I will be able to reuse, once I figure out how to remount it back in the hole.
looking aft from inside/underneath the v-berth. Notice on each side lead weights glassed in place. I cut out the lead weights and moved them around trying to find a better place for them. I weighed them while I had them loose- 62, 65.5, 68 and 72 lbs apiece. This would have been a nicer way to put them but they went to far forward and were in the way of the water tank. I think I will leave two like this and put the other two up and out from the first two against the hull with a small floor under the first two. That way there will be a passage space under them for bilge water from the chain locker.
[I put in a] small floor I put in for the lead weights. And some blocking to hold them levelish. [Then glassed all 4 weights in]
I got the third set of bracing in for the water tank and a little tabbing on each one of them. Then cut some plywood for the water tank to sit on. The plywood to port was cut out of one of the old bulkheads I took out. Also cut a bulkhead for the aft end of the water tank space. It will only be screwed in place. I got the bilgecoat paint out and painted out the area. Also while painting, I painted under both the port and starboard settees.
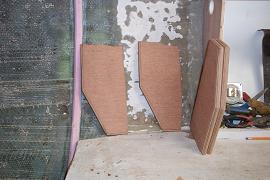
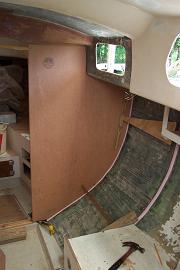
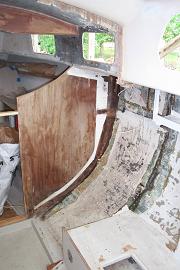
I started working on a poobox. will take up the space behind the head, fit to the hull. It will be a plywood box, glassed over inside and out. The back side of it is curved to fit the hull. The top of the box will bump up to the bottom of the chainplate knee (not yet installed). I left a space between the box and the forward bulkhead for piping going up and down. Rough figuring it comes out to hold about sixteen gallons, give or take. Next on the list of things to do. Screw down the water tank plywood bottom and the aft water tank bulkhead. Set in the tank and fit bracing to hold it down in place. Paint out the area then reinstall the v-berth plywood (water tank opening top) and close it up. Also tab in the aft lower chainplate knees (port and starboard) so I can continue fitting in the poobox. Figure out the plumbing for the head. There are to many ways to do the plumbing but I think I have it worked out to be as simple as I can get it. We will see.
8/2011 – A little more work done in the last few weeks. I set the water tank in place after letting the paint in the area dry. Then I got the plywood filler pieces cut and set in place. I got both port and starboard aft chain plate knees epoxyed in place. Tabbing yet to be done. I started to put a small floor in the chainlocker but when I went to screw a cleat into the bulkhead found it to be in bad shape. So out it came. I then made a pattern for a new bulkhead and figured out it wouldn’t go in in one piece. So it was put in in two pieces. Since the picture was taken the tabbing on the chain locker bulkhead has been added. Two layers of biaxial, one 6″ and one 4″. The tabbing on the two chain plate knees has also been added. Same two layers.
3/2012 – Old head thru-hulls, in and out. The out valve has already been taken out. Cut out cloth for the inside and outside, first round 4-5 layers each. also got the forward, port, chainplate knee epoxied in place with fillets.
4/2012 – I got the patches painted. And while I had the paint out I hit the anchor locker, and I ran out of paint. This is the second time I have painted in the anchor locker. I just can not seem to reach into it and be able to get to much of it with out leaning on wet paint. So I am doing it in stages. Left to get to is the top and the forward side of the bulkhead. I also primed and painted several misc. pieces (storage area floors, dividers and lids).
I cut out two cleats and epoxied them into place above the v-berth shelves, port and starboard, to hold a plywood face on the shelves. I think I have the all the v-berth area sanded and ready to be primed and painted. For the heavy sanding/grinding I had an old Sears 7″ grinder using coarse sanding discs (it just had it’s back end bearning go out and ate up the brushes also). For the finer sanding I have a small Porter Cable 5″ sander. I go through a lot of discs with it, but it gets the job done.
I got the three panels cut out and fit into place for under the v-berth. I still have to decide on the size of the openings in them. They will all have openings with some kind of cabinet doors on them.
I started varnishing on the forward side of the v-berth bulkheads (port and starboard) so I can then start priming and painting in the v-berth area. I figure it will be easer to clean paint off varnish then unpainted wood that will be varnished.
I added some fairing epoxy to the underside of the aft hatch where I had filled in an old vent hole in it. Getting it ready for painting. Both of the cockpit locker lids had some pin holes on the underside of them into the core. It would get mold in them. So I coated them with clear epoxy to try to seal them up after I sanded them.
I got a coat of primer on the outside of the poo box, poo box lid and the underside of the aft hatch. I am getting the other bulkheads taped out, getting them ready for varnish.
I had been putting it off for years, but about a year ago I broke down and ordered nine sheets of Meranti BS 1088 out of Florida and had it shipped. I got 4 sheets of 3/4″, 3 sheets of 1/2″ and 2 sheets of 1/4″ for $941.25 including shipping. I had it shipped to a business for a cheeper shipping cost. The two 3/4″ bulkheads I thought would have to be cut out of two sheets but they actualy only needed one.
All the face plywood is 1/2″ birch from Home Depot. I got the face plywood for the v-berth shelves and the settees (port and starboard) cut out, fitted, sanded and the first coat of varnish on them. The faces will be varnished and the backsides will be primed and painted white.
5/2012 – A coat of primer in most of the v-berth area. And a second coat of varnish on the settee faces and the v-berth shelf faces. Also the fifth coat of varnish on the bulkheads.
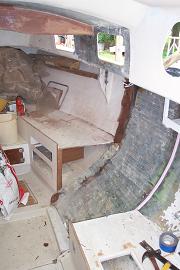
6/2012 – I got the backsides of the V-berth shelf faces and settee faces primed and painted. Working in the head area, I added a couple support blocks under the platform for the head. I plan on putting the 1 1/2″ thru hull in the space to the left, if it will fit and the hoses work out.
Also in the same area, I am puttng in a shelf for the poobox to sit on. I cut out a pattern for a mimi bulkhead to be epoxyed into place along the edge of the shelf going up to hold the poobox in place (forward side). That will leave a space for hoses going up. One from the head into the top of the poobox and another from a tee (line to thru hull) under the poobox for pump out. And spread a little epoxy fill to smooth things up (not sanded yet).
I got the poo box mini bulkhead cut out, fittted and epoxyed into place. I also cut out the openings in the V-berth plywood faces and got two coats of varnish on them today. Later in the day I added a fillet to the aft side of the mini bulkhead and a 4″ piece of tabbing to the forward side of it. I then cut out a piece of biaxel cloth and epoxyed it on the underside of the poo box lid. I also added a 1 1/2″ strip of 1/2″ plywood to the forward inside edge of the poo box mini bulkhead. I taped off the bulkheads in the head area and got two coats of varinsh on them.
I have also been working on all the hair line cracks in the main cabin’s head liner. Scratching out the cracks with the point of a chisel and then filling with epoxy filler. I am not sure if this is going to work, long run, but I am giving it a try.
I got the first coat of paint on the port settee/bulkhead area. And the first coat of primer on the backside of the V-berth faces. The front sides have five coats of varnish on them. Also I cut out and primed four cleats for the top of the poo box to help hold the lid on.
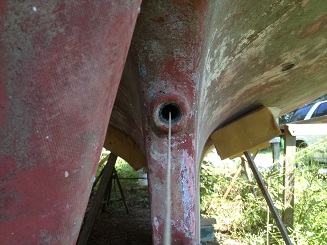
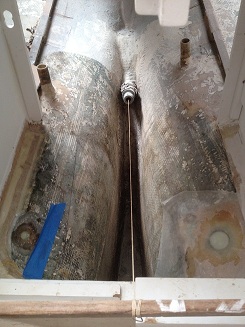
Moving aft in the boat, I cleaned out the motor area. I dug out my old motor mockup and set it in place. The old sink seacock/thru hull needs to be taken out and the hole filled in. I am going to use a shower sump for the sink drain and ice box drain that will pumped out somewhere (transom ?).
9/2012 – I got the old 1 1/2″ seacock/thru-hull for the sink drain cut out. I beveled out the sink drain hole and the hole for the old 3/4″ water intake on the other side. Epoxyed on four layers of biaxel on the out side of the hull on both holes today. Also back to scratching out the cracks in the head liner and filling with epoxy.
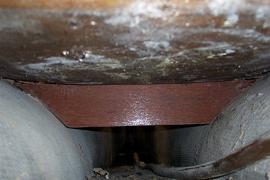
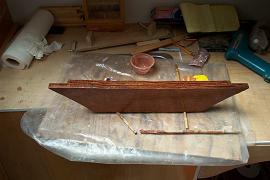
10/2012 – Last week I finished off filling the two thru-hull holes. Now I was able to start on the engine beds. After getting all four plywood blocks epoxyed into place I cut out two layers of biaxial tape (one 6″ and one 4″). I then epoxyed them in place. I used the extra epoxy to coat all the plywood also. I plan on covering the engine beds with one layer of biaxial cloth lapping down over the tabbing holding them in place. So while all that was wet I started on the starboard battery box. It is located in the starboard cockpit locker (forward end) aft of the ice box. This one will hold two 6 volt batteries. Most of the pieces are cut out, except the lid. Still have to glue-screw into place.
Image Gallery


Comment Form